ABOUT
THE METER
DESCRIPTION
The INFCH thermistor indicator/controller converts the resistance
of a thermistor probe to the equivalent temperature. The meter can be
configured to use eight of the available thermistor probe types. There
are four full digits to display temperature in Fahrenheit or Celsius.
Maximum and minimum temperature values are retained and can be displayed
or reset with the push of a front panel button. Two optional setpoints
are available to control internal form C relays for process control. An
optional analog output is available to send a scaled proportional voltage
or current to a remote device. A internal mechanical lockout has been
included to guard against unauthorized changes.
FEATURES
The following is a
list of standard features:
* 4-digit, 14-segment LED display
* ▒0.2ºC accuracy
* ▒.1ºC repeatability
* 44004, 44005, 44006, 44007, 44008, 44016, 44018 and linear 700
thermistor types
* Peak and valley detection and memory
* Non-volatile memory-no battery backup
* Easy setup for proportional control
* 115 or 230 Vac 50/60 Hz power supply
*
NEMA-4 front panel cover
*
.01ºC/F
resolution
*
Front
panel push button lock out
Optional features
(must be ordered at time of purchase):
* Dual 6 amp,
form C relay outputs
* Scalable
analog output
Accessories
and Add-Ons
Table 2-1
Add-On-Options
|
FS
|
Special
Calif/Config. |
|
SPC4
|
NEMA-4
Splash Proof Cover |
|
SPC18
|
NEMA-4
Splash Proof Cover, NEW |
Accessories
|
TP1A
|
Trimplate
panel adapter. Adapts DIN1A/DIN2A cases to larger panel cutouts |
|
RP18
|
19-In.
Rack Panel for one (1) 1/8 DIN instrument |
|
RP28
|
19-In.
Rack Panel for two (2) 1/8 DIN instrument |
|
RP38
|
19-In.
Rack Panel for three (3) 1/8 DIN instrument |
FRONT
OF THE METER
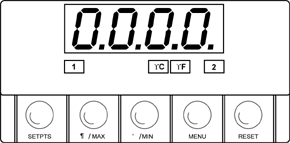
Figure 2-1 shows the front of the meter. |

Figure 2-1. Front-Panel
|
METER
DISPLAY:
Digital LED display
-1.9.9.9. or 9.9.9.9. 4-digit 14 segment, 0.54" high LED display with
programmable decimal point.
These meter display windows light when appropriate(setpoints 1 and 2
light only if your meter has dual relay output capabilities):
1 - Setpoint 1 Status
2 - Setpoint 2 Status
ºC - Celsius
ºF - Fahrenheit
METER BUTTONS
SETPTS BUTTON - If your meter does not have dual relay output
capabilities, pressing this button displays "RUN" and goes back
to the run mode.
If your meter has dual relay output capabilities, this button will sequentially
recall (in the run mode) the previous setpoint settings. As necessary,
use the  /MAX
and /MAX
and  /MIN
buttons to alter these settings, then press the SETPTS button
to store new values. /MIN
buttons to alter these settings, then press the SETPTS button
to store new values.
Unless you press the SETPTS,  /MIN
, or the /MIN
, or the  /MAX
button within 20 seconds, the meter will scroll to setpoint 2 and then
to the run mode. /MAX
button within 20 seconds, the meter will scroll to setpoint 2 and then
to the run mode.
 /MAX Button
In the run mode, this button will recall the PEAK reading since
the last press of the RESET button. /MAX Button
In the run mode, this button will recall the PEAK reading since
the last press of the RESET button.
In the configuration mode, press this button to change the value of
the flashing digit shown on the display and/or toggle between menu choices,
such as "R.1=F" or "R.1=C". When configuring your setpoint
values, press the  /MAX
button to advance the flashing digit's value from 0 to 9 by 1. /MAX
button to advance the flashing digit's value from 0 to 9 by 1.
 /MIN BUTTON
- In the run mode, press this button to recall the valley reading
since the last press of the RESET button. /MIN BUTTON
- In the run mode, press this button to recall the valley reading
since the last press of the RESET button.
In the configuration mode, press the this button to scroll to the next
digit.
MENU BUTTON - In the run mode, press the MENU button
to terminate the current measuring process and enter you into the configuration
mode.
In the configuration mode, press the MENU button to store changes
in the nonvolatile memory and then advance you to the next menu item.
RESET BUTTON - In the setpoint mode, press the RESET button
to enter the run mode. The meter shows "RUN" and returns to the
run mode.
In the configuration mode, press the RESET button once to review
the previous menu. Press the RESET button twice to perform a
hard reset. The meter shows "RST" , followed by "INIT"
, then enters the run mode.
In the peak mode, press the RESET button to reset peak value.
The meter shows "PK.RS" and returns to the run mode.
In the valley mode, press the RESET button to reset valley value.
The meter shows "VL.RS" and returns to the run mode.
In the run mode, if your meter does not have dual relay output capabilities,
pressing the RESET button shows "RUN" and goes back to
the run mode. If your meter has dual relay output capabilities, press
the RESET button (in the run mode) to reset the latched setpoints.
The meter shows "SP.RS" and returns to the run mode.
NOTE: When in setpoint or configuration mode, if the meter
shows 9999 or -1999 with all flashing digits, the value has overflowed.
Press the  /MAX
button to start a new value. /MAX
button to start a new value.
FRONT-PANEL
BUTTON LOCK OUT (For Security Purposes)
Jumper Lock Out
To lock all front-panel buttons, remove the S3-A jumper (refer
to Figure 3-2).
To lock the MENU button only, verify that the S3-B jumper is
removed, then install the S3-A and S3-E jumpers (refer to Table 3-1).
If you press the MENU button, the meter shows "LOCK" and
returns to the run mode.
Push Button Lock Out
To lock the RESET, MENU and SETPTS buttons, verify that the S3-A
jumper is installed and the S3-E jumper is not installed, then follow
these steps:
In the run mode -
1. Press and hold down RESET button. The meter shows "SP.RS"
or "RUN" . Do not release the RESET button.
2. Press the MENU button and hold RESET button
down (3 - 5 seconds) until the meter shows "LOCK".
3. Release both buttons.
To unlock the RESET, MENU and SETPTS buttons, follow these steps:
1. Press and hold down RESET button. The meter shows
"LOCK". Do not release the RESET button.
2. Press the MENU button and hold RESET button
down (3 - 5 seconds) until the meter shows "UN.LK"
3. Release both buttons.
BACK OF THE METER
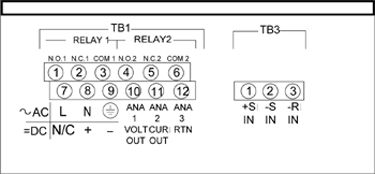
Figure 2-2 shows the connectors on the back of the meter. Table 2-2
on the following page gives a brief description of each connector at
the back of the meter.

Figure 2-2. Connectors
Connector Description Table 2-2
|
CONNECTOR
|
DESCRIPTION |
|
TB1-1
|
Setpoint 1: Normally open (N.O.1) connection |
|
TB1-2
|
Setpoint 1: Normally closed (N.C.1) connection |
|
TB1-3
|
Setpoint
1: Common 1 connection |
|
TB1-4
|
Setpoint
2: Normally open (N.O.2) connection |
|
TB1-5
|
Setpoint
2: Normally closed (N.C.2) connection |
|
TB1-6
|
Setpoint
2: Common 2 connection |
|
TB1-7
|
AC
Line connection (no connection on DC powered units) |
|
TB1-8
|
AC
Neutral connection (+ Input on DC powered units) |
|
TB1-9
|
AC
earth ground (DC- power return on DC powered units) |
|
TB1-10
|
Analog
1 voltage output |
|
TB1-11
|
Analog
2 current output |
|
TB1-12
|
Analog
Return |
|
TB3-1
|
+S
Thermistor input |
|
TB3-2
|
-S
Thermistor input |
|
TB3-3
|
+R
3rd Input for linear thermistor |
Disassembly
You may need to open up the meter for one of the following reasons:
* To check or change the 115 or 230 Vac power jumpers.
* To install or remove jumpers on the main board.
To remove and access the main board, follow these steps:
1. Disconnect main power from the meter.
2. Remove the rear case cover.
3. Lift the back of the main board upwards and slide it out of
the case.
|